The Ultimate Keratin Hair Treatment Guide
A comprehensive guide to achieving flawless hair extensions for Black hair while incorporating keratin hair treatment to maintain healthy, beautiful natural strands.

Introduction
Prebonded hair extensions offer versatile styling options for Black hair, making them a popular choice for adding length, volume, and versatility to natural textures. Whether you’re exploring micro loop, nano ring, I-tip, or U-tip extensions, understanding the right techniques for installation and removal is essential to maintain the health and beauty of your natural hair.
This guide provides step-by-step instructions tailored specifically for Black hair, integrating a keratin hair treatment to ensure flawless results every time. With the right approach, you can enjoy beautiful, voluminous hair while keeping your natural strands strong and resilient.
Healthy Hair First: Always prioritize the health of your natural hair when using extensions
Understanding Prebonded Hair Extension Types for Black Hair
When it comes to Black hair, certain extension methods work exceptionally well with textured hair. Here’s a breakdown of the most popular types:
Micro Loop Hair Extensions
Micro loop extensions use small metal loops clamped onto natural hair. This method is ideal for Black hair as it requires no heat or glue, minimizing damage.
Pro Tip: Pairing with a keratin treatment can further enhance hair strength and shine.
Nano Ring Hair Extensions
Nano rings are tiny, nearly invisible beads that seamlessly blend with natural hair textures. They’re perfect for Black hair as they evenly distribute weight, reducing tension on the scalp.
Pro Tip: Their small size also makes them ideal for fine or thinning hair types.
U-Tip (Fusion) Hair Extensions
U-tip extensions use keratin bonds fused with heat for a secure hold. For Black hair, U-tip extensions provide a natural look but need careful handling to avoid breakage.
Pro Tip: A keratin hair treatment before installation can help protect hair from heat damage.
I-Tip Hair Extensions
I-tip extensions feature individual bonds applied with micro rings. They are less damaging than traditional methods and work well for Black hair when installed correctly.
Pro Tip: The flexibility of I-tips allows for versatile styling options.
Comparison of Hair Extension Methods for Black Hair
| Feature | Micro Loop | Nano Ring | I-Tip | U-Tip (Fusion) |
|---|---|---|---|---|
| Ease of Installation | Moderate | Difficult | Moderate | Difficult (Professional only) |
| Cost-Effectiveness | High (Reusable, DIY possible) | Medium (Req. pro install) | High (Reusable) | Low (Not reusable, pro-only) |
| Damage Risk | Low (No heat/glue) | Very Low (Tiny, lightweight) | Low (No heat/glue) | Higher (Uses heat & adhesive) |
| Natural Look | Good | Excellent (Most discreet) | Good | Good (Bonds can be visible) |
| Styling Versatility | High (Strong hold for styles) | High | High | Good (Avoid high heat on bonds) |
| Longevity | 6-8 weeks | 6-8 weeks | 6-8 weeks | 3-4 months |

Value Meets Health
Micro Loop and I-Tip extensions are reusable and need no heat or glue.
Most Natural Look
Nano ring extensions are tiny and blend seamlessly with natural hair.
Longest Lasting
U-Tip extensions, though they require professional installation and care.
Best Styling Versatility
Micro Loop and Nano Ring methods allow for a range of styling options.
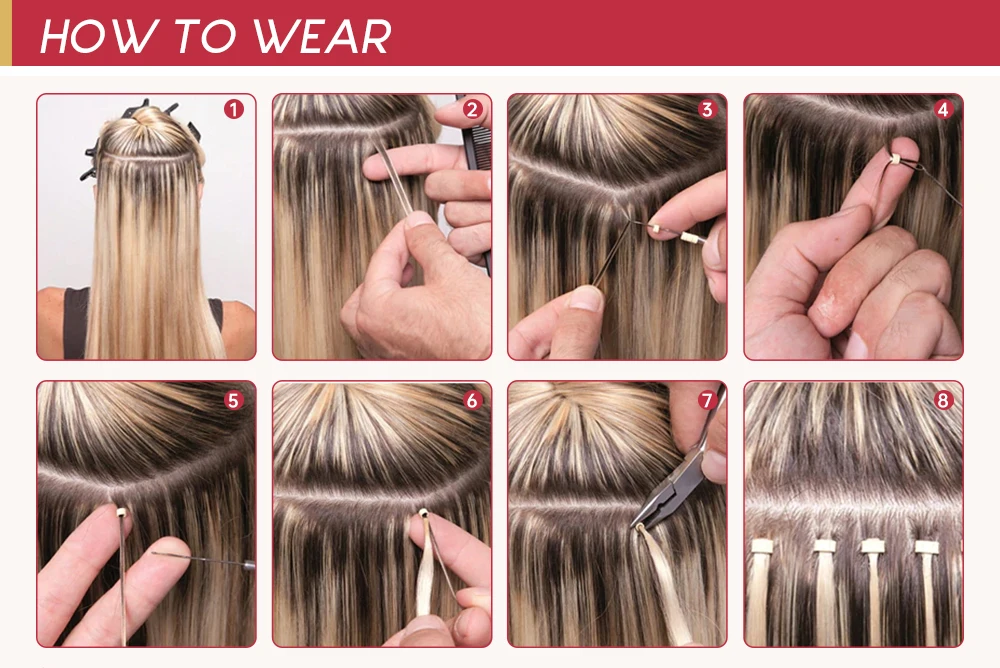
How to Install Micro Loop Hair Extensions for Black Hair
Installing micro loop extensions for Black hair requires precision and care. Follow these steps for a seamless application that maintains the health of your natural hair.
一.Preparation
1.Start with clean, dry hair free from products.
2.Detangle hair thoroughly to avoid knots during installation.
3.Section hair neatly using clips to ensure precise application.
二.Application Process
1.Take a small section of natural hair and thread it through the micro loop.
2.Use specialized pliers to clamp the loop shut, securing the extension.
3.Work in horizontal rows from the nape upwards, maintaining even spacing between bonds (about 1 cm apart).
4.Ensure the extensions are evenly distributed to avoid unnecessary tension on the scalp.
三.Styling After Installation
Wait Time
Wait at least 48 hours before washing your hair to ensure the bonds set properly.
Heat Protection
Use low heat when styling to protect both the extensions and natural hair.
Gentle Handling
Avoid pulling or tugging at the bonds to prevent breakage and damage.
Pro Tip
For curly or coily textures, match the extension texture to your natural hair. Incorporating a keratin hair treatment before installation can enhance blendability and protect your hair from potential damage.
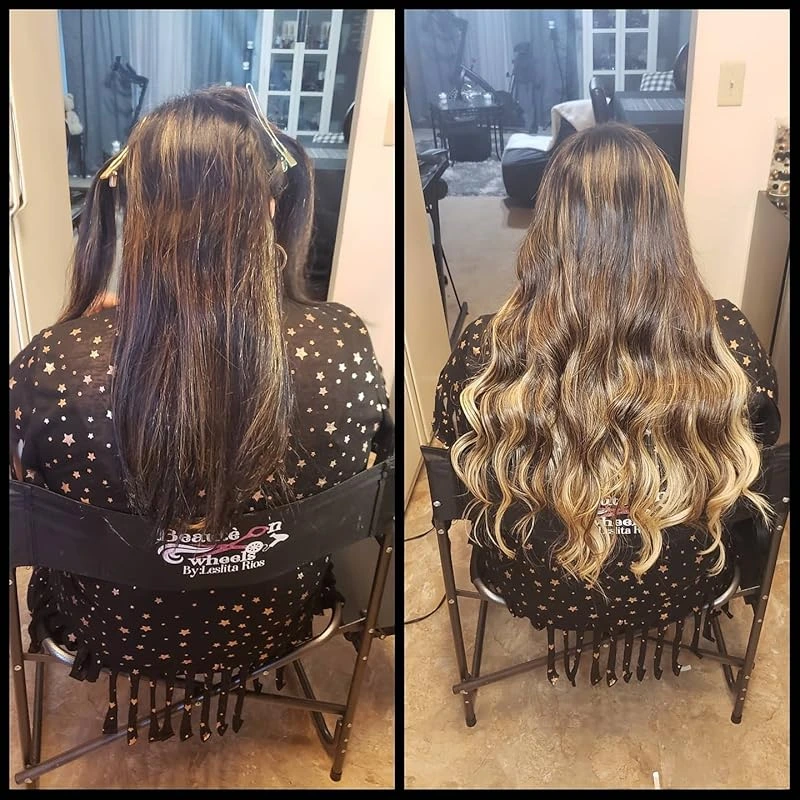
Before and After Installation
How to Remove Micro Loop Hair Extensions for Black Hair
Safe removal is critical to maintaining the health of your natural hair. Improper removal can cause damage and breakage, which is especially important to avoid with Black hair. Here’s how to do it correctly:
Tools Needed
Specialized pliers;Detangling brush;Nourishing conditioner
Steps for Safe Removal
1.Gently open the loops using specialized pliers.
2.Slide the extension off without pulling to minimize stress on the natural hair.
3.Work methodically from the top downward to avoid tangling.
4.After removal, apply a keratin hair treatment to restore strength and moisture.
After Care
Mistakes to Avoid
Deep Condition your natural hair to restore moisture after removal.
Use protein treatments if needed to strengthen hair strands.
Allow your hair to rest for at least a week before reapplying extensions.
Using regular pliers instead of specialized tools, which can damage the bonds and your natural hair.
Pulling or yanking extensions out, which can cause breakage and hair loss.
Neglecting deep conditioning or a keratin hair treatment after removal, which can leave hair dry and brittle.
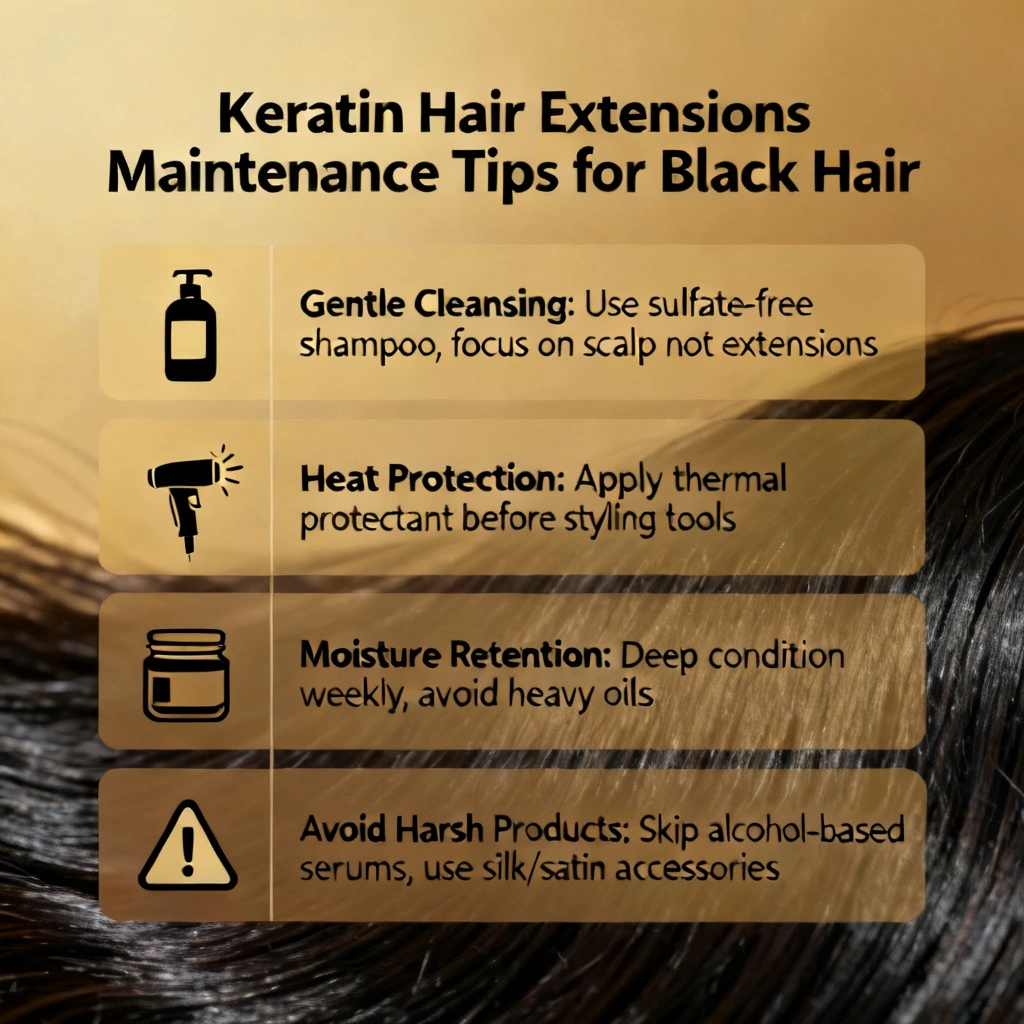
Maintenance Tips for Prebonded Extensions on Black Hair
To keep your extensions looking flawless and your natural hair healthy, follow these essential maintenance tips:
Daily Care
Brush gently 2–3 times daily using a loop brush to prevent tangling.
Sleep with your hair in a loose braid or silk scarf to reduce friction.
Avoid excessive manipulation of the bonded areas.
Professional Maintenance
Visit a stylist every 6–8 weeks for adjustments and maintenance.
Incorporate a keratin hair treatment during maintenance appointments to strengthen hair.
Have your stylist check for any signs of damage or tension on your natural hair.
Washing & Styling
Avoid oil-based products near the bonds to prevent slippage.
Wash hair 1–2 times weekly with a sulfate-free shampoo to maintain moisture.
Use heat protectant before applying any hot tools to your extensions.
Why Choose Micro Loop Extensions for Black Hair?
No Heat or Glue
Reduces the risk of damage to natural hair, which is important for Black hair textures.
Seamless Blend
Creates a flawless, undetectable look that blends naturally with textured hair.
Reusable
Cost-effective and environmentally friendly, as extensions can be reused multiple times.
Gentle on Scalp
Lightweight design reduces tension on the scalp, preventing traction alopecia.
Pro Tips
Pairing micro loop extensions with a keratin hair treatment ensures your natural hair remains strong, moisturized, and healthy throughout the wear period. The keratin treatment fills in gaps in the hair cuticle, providing additional protection against damage.
Frequently Asked Questions
Final Thoughts
Whether you’re new to extensions or a seasoned pro, understanding how to install and remove micro loop hair extensions for Black hair is essential for achieving beautiful, healthy results. By incorporating a keratin hair treatment into your routine, you can enhance the longevity of your extensions and protect your natural strands.
With the right care and attention, micro loop extensions can be a fantastic way to enhance your natural beauty and experiment with different styles while maintaining the integrity of your hair.